Step 2: Database Setup
- Click Run Wizard to launch the server and database setup wizard.

The notes below expand on each stage:
- If you chose to launch the Network Manager manually, or if this is not the first time you have used the Network Manager, you will be presented with the main application screen - Click the Run Wizard icon in the top left of the window (or top right of 'Server Details') to begin the client set-up process as highlighted in red below:
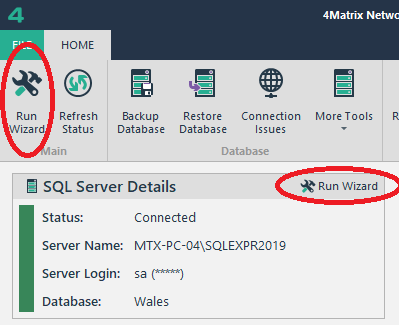
Above: Click Run Wizard to begin the client setup process
- Choose to install a new server or use an existing server (Fig2).
- If installing a new server, give your server a name and assign a password;
The name must:
+ Be between 1 and 15 characters
+ Start with a letter
+ Only contain letters, numbers and the symbols # (hash) and _ (underscore)
The password must:
+ Be between 8 and 15 characters
+ Start with a letter
+ Contain at least 2 upper case letters, 2 lower case letters, 2 numbers and 2 special characters
+ Only contain letters, numbers and the special characters # (hash), _ (underscore), $ (dollar), £ (pound), % (percentage), ! (exclamation) and ? (question)
Example password: DAtabase2019$#
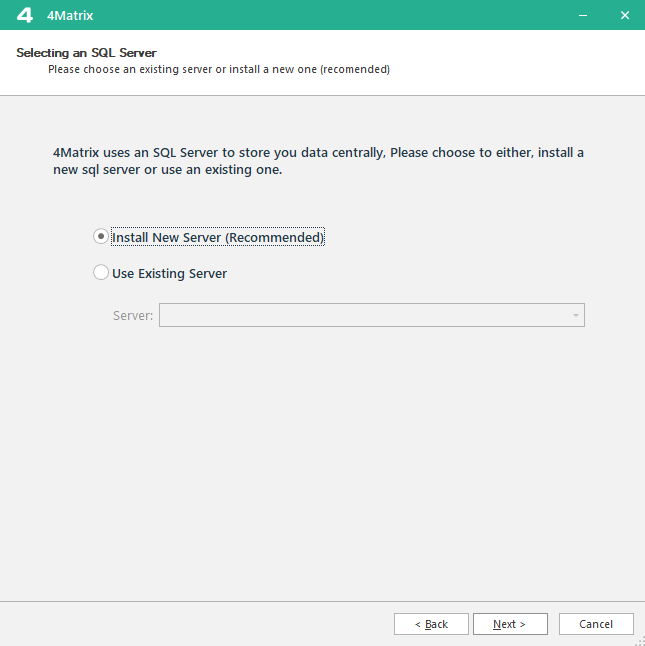
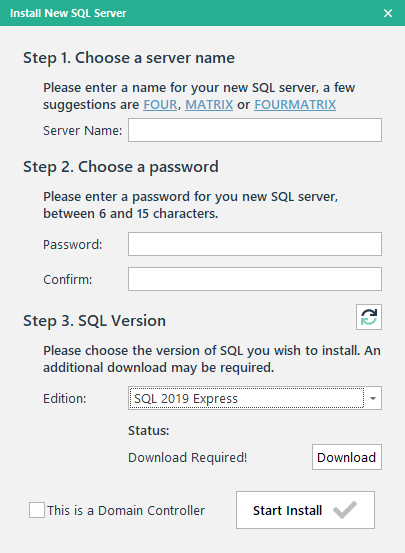
Fig2: Installing a new server and giving it a name/password
- Choose the version of SQL Server that you wish to download and install. The default selection is SQL 2016 Express, but you can also choose 2017, 2019 or 2022.
- Select Download you'll see the following screen:

- Choose Start Download and wait for the file to be downloaded.
- Place the SQL exe in the 4Matrix Files folder as per the instructions (if not downloaded to that folder).
- Choose Download Complete and then click Start Install. This process may take up to 15 minutes depending on the version of SQL you have chosen.
Note: If you receive an error during the SQL installation, close the wizard, and go to your 4Matrix folder i.e. C:\4Matrix\Files. Run the SQL.exe file and install SQL outside of the 4Matrix installation. Make sure, when prompted, to use Mixed Mode Authentication. If you see an error during this installation, it should provide more details. Usually, any errors seen here are because the server requires a restart. Once installed, open the 4Matrix Network Manager, run wizard, and choose to use your new (existing) server.
- Once the SQL installation is complete, the wizard will continue. The SQL login details will default to sa (systems administrator) and the password that you entered in the previous step. Click next (Fig3).
- Choose your new database type (England or Wales) and give it a name. We suggest using FOUR or MATRIX (Fig3). Note that you are installing a new database which contains demo data for your selected database type. England comes pre-set to demonstrate Progress 8, EBacc, and so on, whereas Wales is set to show Capped 9, Welsh Bacc, etc. Your default school-type setting can be changed later on in 4Matrix if the incorrect version is selected.

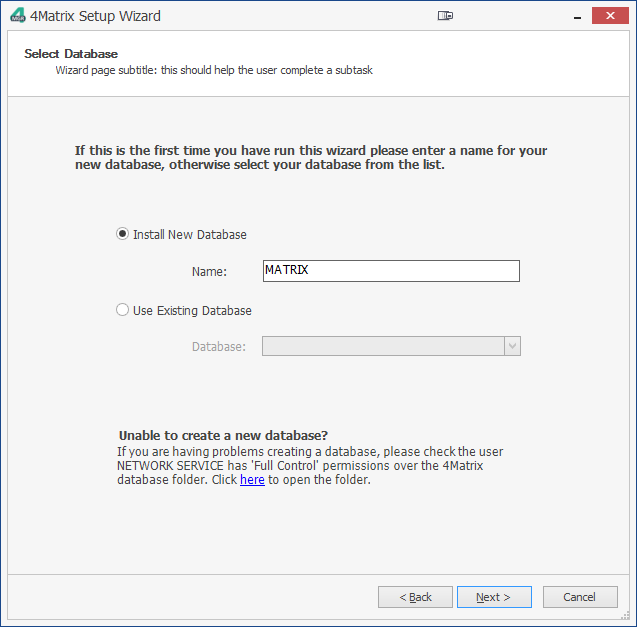
Fig3: SQL login details and creating a 4Matrix database
Note: If you receive an error at this point saying the database cannot be created, you will need to grant the Network Service full permission over the 4Matrix Database folder.
The next step is important and must be set up correctly to ensure that 4Matrix can update itself on client workstations (Fig4).
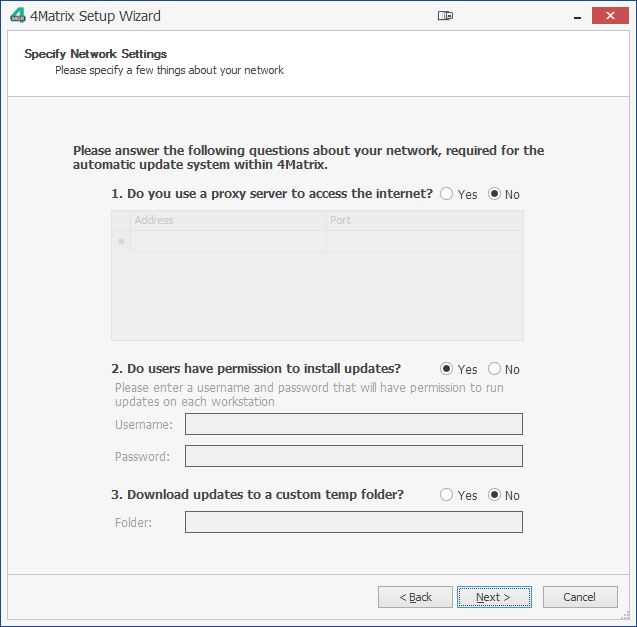
Fig4: Your Network Settings
1) Do you use a proxy server to access the internet?
If your network uses a proxy server to connect to the network choose Yes and enter the details. You can find these by going to Internet Explorer and choosing Tools > Internet Options > Connections but they need to be those that apply to users on the network. You can also type AUTO into the Address field and a random number in the Port field if you are unsure of the proxy settings.
Note: If you receive an error message after completing these details, make sure the line below your proxy details is blank, i.e. right click and press delete.
2) Do users have permission to install updates?
There are 2 update 'modes' that the 4Matrix Desktop client can use to automatically update itself when launched, using either a Windows Service or by running as an Elevated User.
The Windows Service mode is new. We now refer to the Elevated User mode as the legacy option.
If using 4Matrix client msi 3.9.8.0 or higher and a LauncherSettings.xml file, the 'Windows Service' mode will be the default setup.
- The setting 'Do users have permission to install updates' can be left as YES if using the Windows Service mode.
- The setting 'Do users have permission to install updates' must be set to NO if you are not using the Windows Service and users do not have Full Control over the 4Matrix client folder on their PC’s (e.g. C:\Program Files (x86)\4Matrix). You must enter a different username and password to run the updates with (Run As). Please note that the updates will be downloaded as the logged in user, NOT the user specified here. You must include a domain name, i.e. myschool.org\admin; make sure it is the FULLY QUALIFIED domain.
3) Download updates to a custom temp folder?
By default, updates are downloaded to the logged-in user's temp folder (%temp%). If this folder is blocked or hidden from users, you can specify a different path e.g. %USERPROFILE%\4MatrixUpdate
RM Schools: If not using the Windows Service mode, you will need to supply an elevated user to run updates as, add a custom temp folder, AND give users full control over the 4Matrix folder on their C drives.
Further reading
- For information on update problems please see: Update Errors
- For information on configuring a custom update server, please see: Custom Update Server
- For information on configuring 4Matrix to run from a shared folder, please see: Running From a Shared Folder